# watch原理
watch的原理,内部是通过$watch实现的。
# watch选项初始化
在Vue初始化时,首先进行的就是数据选项的初始化,包括data、computed、以及watch,如下图所示:
function initState (vm: Component) {
  vm._watchers = []
  const opts = vm.$options
  // ...code
  // 用户自定义watcher
  if (opts.watch && opts.watch !== nativeWatch) {
    initWatch(vm, opts.watch)
  }
}
2
3
4
5
6
7
8
9
initWatch就是对用户定义的watch选项进行初始化,过程如下:
- 循环watch选项,给每个key通过
createWatcher函数,添加用户watcher,而createWatcher函数最终调用的$watch方法。- 注意,watch选项有很多写法,所以在
initWatch -> createWatcher方法中,分别对这些情况做了兼容处理。
- 注意,watch选项有很多写法,所以在
function initWatch(vm: Component, watch: Object) {
  // 给每一个key创建watcher
  for (const key in watch) {
    const handler = watch[key]
    if (Array.isArray(handler)) {
      for (let i = 0; i < handler.length; i++) {
        createWatcher(vm, key, handler[i])
      }
    } else {
      createWatcher(vm, key, handler)
    }
  }
}
2
3
4
5
6
7
8
9
10
11
12
13
function createWatcher (
  vm: Component,
  expOrFn: string | Function,
  handler: any,
  options?: Object
) {
  // watcher的key是对象的写法: key: { handler: fn, deep: true, immediate: true }
  if (isPlainObject(handler)) {
    options = handler
    handler = handler.handler
  }
  // handler是字符串的写法: key:'someMethod'
  if (typeof handler === 'string') {
    handler = vm[handler]
  }
  // 调用$watch方法
  return vm.$watch(expOrFn, handler, options)
}
2
3
4
5
6
7
8
9
10
11
12
13
14
15
16
17
18
19
# $watch过程分析
接下来我们详细看下$watch方法中到底做了哪些事情?
- 创建一个Watcher实例,我们称之为
用户watcher,以options选项中的options.user = true为标识,并返回一个函数(该函数可以取消监控)。
Vue.prototype.$watch = function (
    expOrFn: string | Function,
    cb: any,
    options?: Object
  ): Function {
    const vm: Component = this
    if (isPlainObject(cb)) {
      // 用户直接调用,例如vm.$watch('name',{ handler: fn, deep: true, immediate: true })
      return createWatcher(vm, expOrFn, cb, options)
    }
    options = options || {}
    // 用户watcher
    options.user = true
    // 用户watcher的"expOrFn",就是是watch选项的key
    const watcher = new Watcher(vm, expOrFn, cb, options)
    if (options.immediate) {
      try {
        cb.call(vm, watcher.value)
      } catch (error) {
        handleError(error, vm, `callback for immediate watcher "${watcher.expression}"`)
      }
    }
    return function unwatchFn () {
      watcher.teardown()
    }
  }
2
3
4
5
6
7
8
9
10
11
12
13
14
15
16
17
18
19
20
21
22
23
24
25
26
- 在执行
new Watcher时,**expOrFn**就是我们监控的那个key_。_由于_expOrFn_是一个字符串,先通过parsePath (opens new window)函数将expOrFn转换为一个函数并赋值给this.getter,然后调用this.get方法。- pushTarget:当前用户watcher入栈,放入watcher队列中
- 执行getter函数,对监控的key取值。由于key是响应式的,此。时会触发key对应的get (opens new window)方法,进行依赖收集。即key对应的dep会收集当前watcher,并存入subs数组中。同时,watcher也会收集当前dep,存入deps数组中。
- 如果deep为true,则会通过traverse(value) (opens new window)方法,循环读取value的每一个key,递归收集依赖。
- popTarget,依赖收集完成后,当前用户watcher出栈。
get () {
    // 全局的Dep.target = 当前渲染watcher, 或者用户watcher
    pushTarget(this)
    let value
    const vm = this.vm
    try {
      // 调用getter方法 --> updateComponent -> vm._render,vm取值,触发defineReactive的get方法,进行依赖收集。
      // 此时全局的Dep.target = this,即当前的watcher
      // value是老的值,
      // 1、对渲染watcher而言,this.getter执行时,就会执行updateComponent方法-> vm._update(vm._render()),取值并生成vnode。此时每个key的dep就会收集“渲染watcher这个依赖”
      // 2、对用户watcher而言,this.getter执行时,会去vm上取对应watch的那个key的值,然后这个key的dep就会收集"用户wather"这个依赖。
      // 3、对计算属性wather而言,this.getter,会去执行key对应的函数(这个函数内部会去取vm上的其他key值,其他key的dep就会收集计算属性watcher这个依赖)
      value = this.getter.call(vm, vm)
    } catch (e) {
      if (this.user) {
        handleError(e, vm, `getter for watcher "${this.expression}"`)
      } else {
        throw e
      }
    } finally {
      // "touch" every property so they are all tracked as
      // dependencies for deep watching
      // 如果deep为true,表示当前为用户watcher,此时的this.getter就是我们求表达式值的方法(parsePath(expOrFn)),value就是我们watch的那个key的值.
      // 深度监听时,调用traverse方法,它会遍历value对象的每一个key并取值,触发其get方法,进行依赖收集,
      // 即:将对象的每一个key对应的dep添加到当前watcher的dep数组中,同时每一个dep的subs中添加当前watcher
      if (this.deep) {
        traverse(value)
      }
      // 结束后进行清理操作
      popTarget()
      // 清理deps,将newDeps赋值给deps,newDepIds赋值给depIds。同时清空newDeps、deps
      this.cleanupDeps()
    }
    return value
  }
2
3
4
5
6
7
8
9
10
11
12
13
14
15
16
17
18
19
20
21
22
23
24
25
26
27
28
29
30
31
32
33
34
35
当组件挂载时,即mountCompont (opens new window)时,会创建一个渲染watcher。这个渲染watcher会调用vm._render()方法生成vnode,再调用vm._update(vnode),进行虚拟dom的patch,最终生成真实dom。
- 在调用
**_render**方法时,会执行组件内部的render函数(模板最终会被编译成render函数),此时会从vm实例中取data中对应key的值,触发key的get (opens new window)方法,进行依赖收集。此时key对应的dep会收集当前渲染watcher,渲染watcher也会收集key对应的这个dep。
updateComponent = () => {
  // vm._render:src/core/instance/render.js,75行,
  // vm._render生成vnode:内部调用createElement生成vnode

  // vm._update:更新vnode,位置:lifecycle.js:Vue.prototype._update
  vm._update(vm._render(), hydrating)
}
new Watcher(vm, updateComponent, noop, {
    before () {
      if (vm._isMounted && !vm._isDestroyed) {
        callHook(vm, 'beforeUpdate')
      }
    }
  }, true /* isRenderWatcher */)
2
3
4
5
6
7
8
9
10
11
12
13
14
- 此时key对应的dep,就有了2个watcher依赖:[用户watcher、渲染watcher]
当key的值发生变化时,触发key的set (opens new window)方法,然后代用dep.notify通知更新。
- dep.notify方法,会依次循环dep的subs数组(watcher数组),调用watcher的update方法
  notify () {  // 发布
    // 获取dep对应的watcher数组
    // stabilize the subscriber list first
    const subs = this.subs.slice()
    if (process.env.NODE_ENV !== 'production' && !config.async) {
      // subs aren't sorted in scheduler if not running async
      // we need to sort them now to make sure they fire in correct
      // order
      // watcher按照从小到大的循序排列(watcher从父到子排列)
      subs.sort((a, b) => a.id - b.id)
    }
    // 循环调用watcher.update方法
    for (let i = 0, l = subs.length; i < l; i++) {
      subs[i].update()
    }
  }
2
3
4
5
6
7
8
9
10
11
12
13
14
15
16
- 调用update方法时,如果dirty为true(计算属性watcher),则将dirty设置为true。否则调用queueWatcher方法,将watcher放入一个队列中,并在下一个tick中依次执行watcher。
  update () {
    /* istanbul ignore else */
    if (this.lazy) {
      // update时,如果是计算属性watcher,设置watcher的dirty为true, 稍后渲染的时候,重新取值
      this.dirty = true
    } else if (this.sync) {
      this.run()
    } else {
      queueWatcher(this)
    }
  }
2
3
4
5
6
7
8
9
10
11
- queueWatcher方法中,依次将watcher放入queue队列中,并在
nextTick中执行flushSchedulerQueue,flushSchedulerQueue会依次循环执行watcher的run方法,而watcher的run方法中,会依次执行各自watcher的get方法,进行数据的重新渲染。
function queueWatcher (watcher: Watcher) {
  // 不同dep可能依赖相同watcher,此时需要对watcher去重
  const id = watcher.id
  // 1.判断watcher是否已经存放了
  if (has[id] == null) {
    has[id] = true
    if (!flushing) {
      // 2.将watcher存放到队列中
      queue.push(watcher)
    }
    // queue the flush
    if (!waiting) {
      waiting = true
      // 3. 在下一个事件环中,调用flushSchedulerQueue,清空queue队列
      nextTick(flushSchedulerQueue)
    }
  }
}
2
3
4
5
6
7
8
9
10
11
12
13
14
15
16
17
18
- 当执行用户watcher的run方法时,由于
this.user为true,如果value发生变化,则会执行对应的cb方法。
  run () {
    if (this.active) {
      // 获取新的值
      const value = this.get()
      if (
        value !== this.value ||
        // Deep watchers and watchers on Object/Arrays should fire even
        // when the value is the same, because the value may
        // have mutated.
        isObject(value) ||
        this.deep
      ) {
        // set new value
        const oldValue = this.value
        this.value = value
        if (this.user) {
          try {
            // 当用户watch的值发生变化,执行cb方法
            this.cb.call(this.vm, value, oldValue)
          } catch (e) {
            handleError(e, this.vm, `callback for watcher "${this.expression}"`)
          }
        } else {
          this.cb.call(this.vm, value, oldValue)
        }
      }
    }
  }
2
3
4
5
6
7
8
9
10
11
12
13
14
15
16
17
18
19
20
21
22
23
24
25
26
27
28
# $watch依赖收集流程图
# App.vue
<template>
  <div>
      <p>msg</p>
  </div>
</template>

<script>
export default {
    data() {
        return {
            msg: 'hello'
        }
    },
    watch: {
        'msg': function(newValue, oldValue) {

        }
    }
}
</script>
2
3
4
5
6
7
8
9
10
11
12
13
14
15
16
17
18
19
20
21
- 执行
initWatch(vm.$options),初始化watch选项; - 调用
createWatcher,根据key、handler,对watch选项格式化; - 调用
$watch方法,创建用户watcher,并赋值this.getter;
this.getter = parsePath(expOrFn)
- 调用watcher的get方法:
- 将当前用户watcher入栈
- 执行getter,对msg取值。触发msg的get方法,此时
dep_msg会收集当前watcher依赖,当前watcher也会收集dep_msg。 - 如果deep为true,执行traverse(value) (opens new window),循环对value对象的每个key取值,递归收集依赖。
- 用户watcher出栈
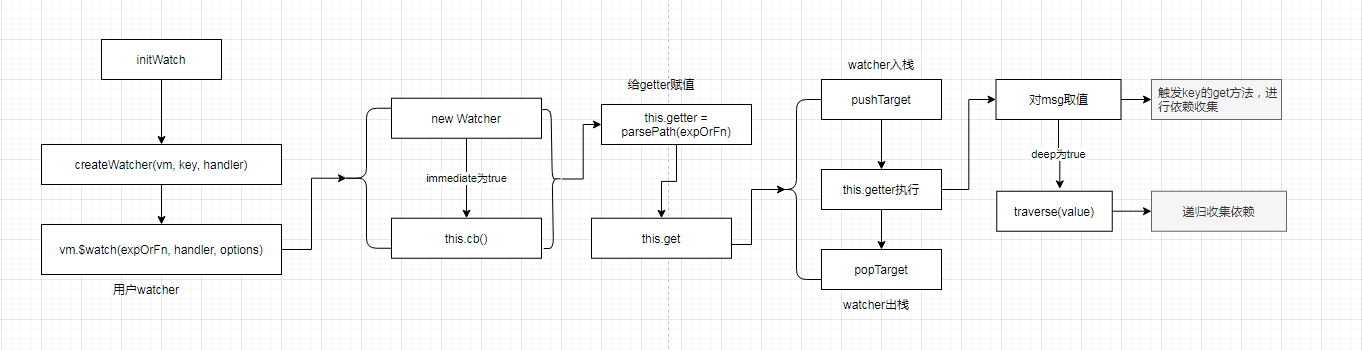
App.vue挂载时,创建渲染watcher,执行vm._render方法,生成vnode。在这个过程中,页面会对msg取值,触发msg的get方法,此时dep_msg会收集渲染watcher依赖,渲染watcher也会收集dep_msg。至此,组件挂载完成后,dep_msg的subs数组中收集了2个依赖:[用户watcher、渲染watcher]。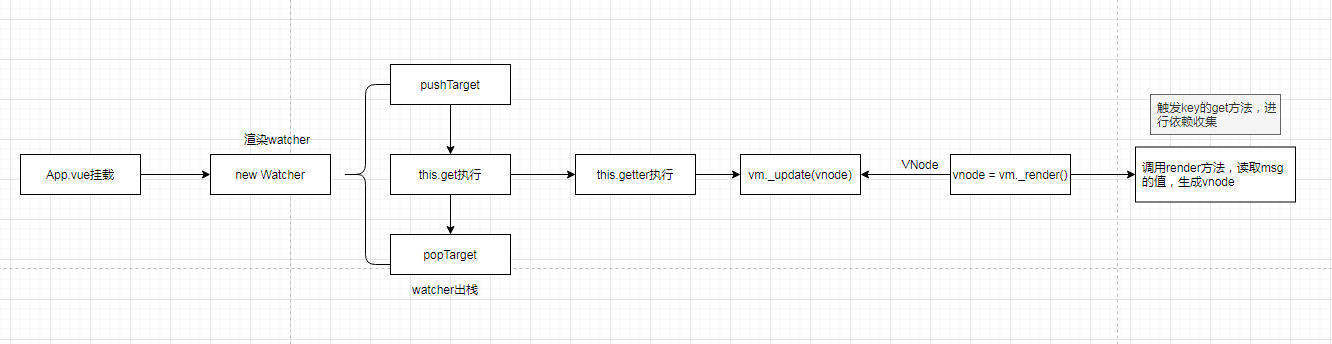
当msg发生变化时:依次执行dep.notify -> 循环执行watcher.update -> queueWatcher -> flushSchedulerQueue -> watcher.run -> this.get 渲染页面。同时,如果数据变化,执行this.cb(用户的回调)。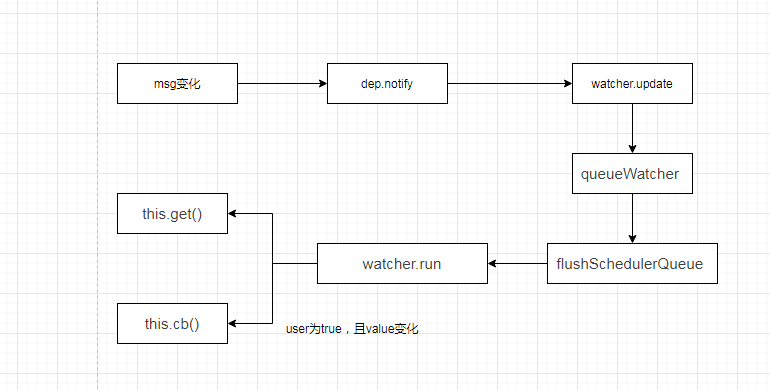
# deep的实现原理
在执行$watch -> new Watcher时,如果deep为true,会执行**traverse(value)**方法,对value对象的每个key进行依赖收集(收集当前watcher)。因此,只要value中任何一个key的值发生变化,就会触发其响应式的set方法,对应的dep就会执行notify,通知页面更新。
// watcher get方法
get () {
    // 当前watcher入栈
    pushTarget(this)
    let value
    const vm = this.vm
    try {value = this.getter.call(vm, vm)
    } catch (e) {
      if (this.user) {
        handleError(e, vm, `getter for watcher "${this.expression}"`)
      } else {
        throw e
      }
    } finally {
      // 如果deep为true,表示当前为用户watcher,此时的this.getter就是我们求表达式值的方法(parsePath(expOrFn)),value就是我们watch的那个key的值.
      // 深度监听时(deep为true),调用traverse方法,它会遍历value对象的每一个key并取值,触发其get方法,进行依赖收集,
      // 即:将对象的每一个key对应的dep添加到当前watcher的dep数组中,同时每一个dep的subs中添加当前watcher
      if (this.deep) {
        traverse(value)
      }
      // watcher出栈
      popTarget()
    }
    return value
  }
2
3
4
5
6
7
8
9
10
11
12
13
14
15
16
17
18
19
20
21
22
23
24
25
← Vue响应式原理 computed原理 →